
When you first log in to Planisphere, the Search page is your starting point.
STEP 1 – Perform a search
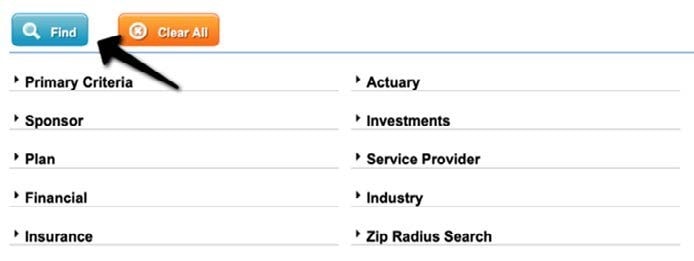
Search criteria are grouped into 10 categories, any combination of which can be used to select plans:
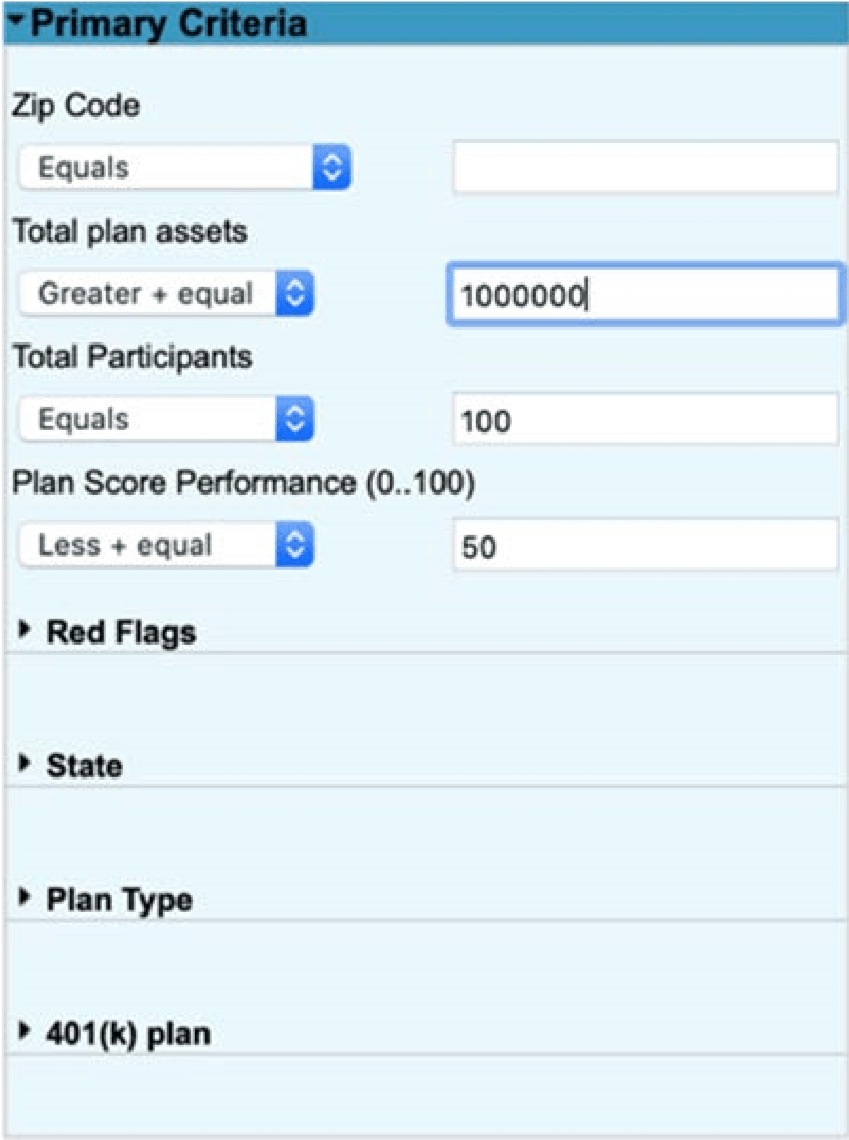
- Primary Criteria: Refers to the main search criteria such as zip code, assets, participants, plan performance, etc.
- Sponsor: Refers to characteristics of the Sponsoring entity; such as name, address, zip code, contact and even the Federal ID #.
- Plan: Refers to various plan information; such as plan name, type, features and number of participants.
- Financial: Refers to information on plan assets, income, contributions and investments.
- Insurance: Refers to information found on Schedule-A, including insurance providers, products, costs, brokers, premiums and commissions.
- Actuary: Refers to actuarial information found on Schedule-B.
- Investments: Refers to information on plan investments, investment providers and dollar values.
- Service Provider: Refers to service provider name, fees, names of trustees, custodians, administrator and service codes.
- Industry: Refers to industry indicator of plan sponsor.
- Zip Radius Search: Uses a zip code as a center point and selects additional plans within a specified radius of the center zip code.
Search Criteria Dropdown Menus:
To view your search options under any of the nine categories listed, simply click on the category name. A dropdown menu will open with all of the search options for that category. Put a tick next to required criteria. To minimize a dropdown menu, simply click again on the category bar at the top.
Running Totals:
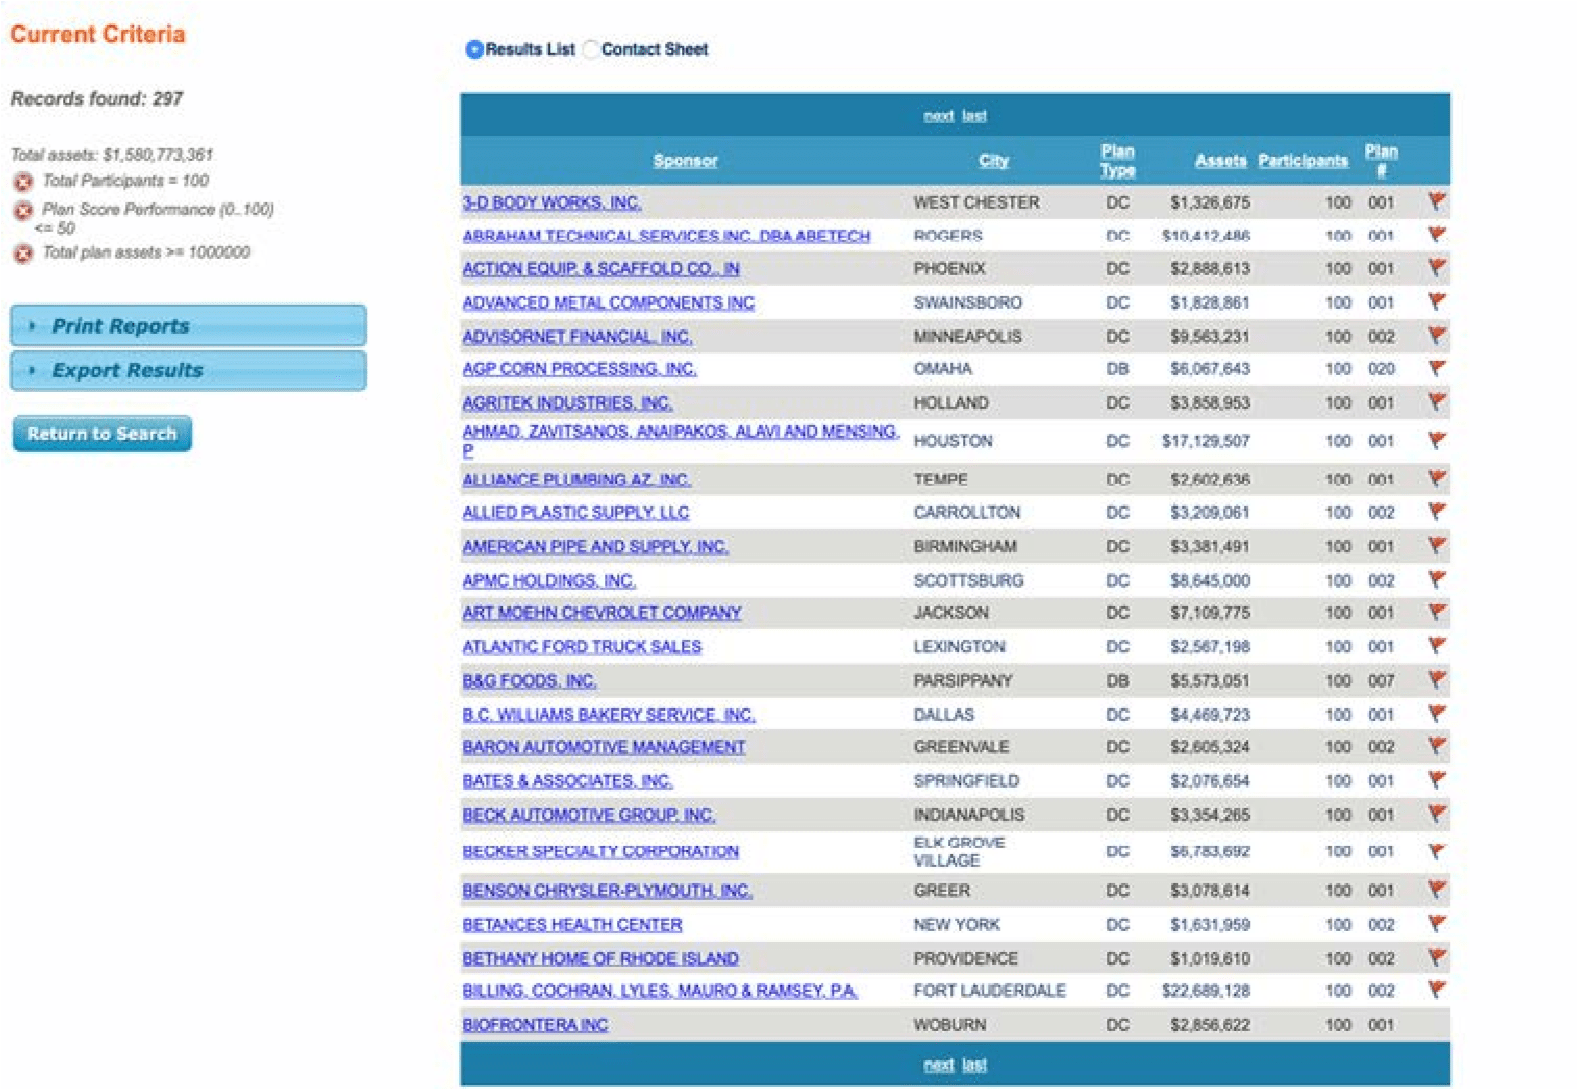
In the upper left corner of the search page and the list page you will see a running count of records that meet the criteria you’ve entered. A list of the search terms you’ve used will also be displayed. You can remove any or all of the search criteria by clicking the circled «X» next to each search field. This will enable you to delete a field without having to go back and open the search Category.
Once you have entered all of the criteria you wish to select by, click the Find bar at the top of the page. Upon clicking the «Find» bar the list of records/plans that your criteria produced will be displayed.
STEP 2 – View List of Results
The initial list of results is in alphabetical order by Sponsor’s
Name. There are 6 columns of data: «Sponsor», «City», «Plan Type», «Assets», «Participants» and «Plan #». You can sort your list of plans using any of these categories. Simply click on the column header. Clicking once will put records in ascending order. Clicking twice will put them in descending order.
You will also notice that on the far right a column will appear with an icon for any record you’ve previously flagged for follow up. Mouse-over the icon to see a summary of your notes on that contact.
After clicking on the search bar and generating your list, the first 25 records produced by your search will be displayed. You can easily page through to the next 25 by clicking on the page numbers at the top of the list.
On the left-hand side of this page you’ll see three bars; the first is for printing your results, the next is for exporting your results and last one is to return to the main search page. Above the bars you’ll also see your search criteria along with the number of records found.
STEP 3 – Export results
On the left-hand side of the list of plan sponsors (displayed right after you run a search), you’ll see a blue bar that reads, «Export Results». Clicking on this bar will give you a drop down menu of export options. First choose a list format or a detail format. List formats are: «List of Plan Sponsors» and «Labels». The list of sponsors will include just the 6 columns you see on your list («Sponsor», «City», «Plan Type», «Participants», «Assets» and «Plan #»). The labels option will give you just the fields you need to print mailing labels (name, company and full address) in PDF format.
Detail formats will give you more fields of information on the plan. Your choices are, «Plan Summary», «Financial Information»,
«Insurance & Brokers Information», «Insurance Information
Only», «Actuarial Information», «Service Provider/Trustee Information», «Investment Information», and «Custom». Note that the information in these export settings corresponds with the information you’ll see on the plan detail reports (when you click on a plan on your list). Have a look at what fields are on each report and see which one you might like.
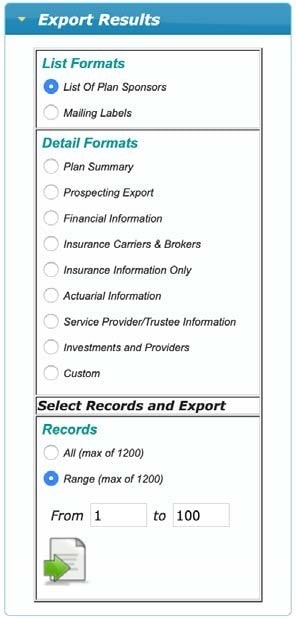
If you have very specific needs, you can always create and save custom export settings by clicking on «Custom». This will allow you to «cherry pick» from a list of all available fields.
Finally, select one of the options from the «Records» field: «All (max of 1200)» or
«Range (max of 1200)». Once you’re finished, simply click on the «Export» bar and click on «Open» in the dialogue box when prompted. Your data will be displayed in an Excel spreadsheet (PDF for labels).
STEP 4 – View plan information
After clicking on a specific plan on your list, you’ll be taken to the reports page with detailed information on that plan. To view any of the detailed reports on any plan in your list, just click on the «Sponsor» name. This will take you to the «Plan Summary» page with all of the reports/options listed below.
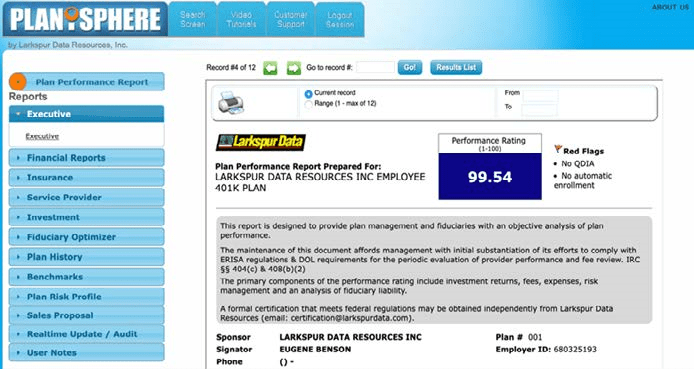
On the left-hand side of your page you’ll see 12 blue bars:
- Executive: If there’s this section in the plan, it will give you contact information for the executives in this plan.
- Summary: This is the report you start with. It has basic information on the plan such as company name, address, contact name, phone, assets, participants…etc.
- Financial: This report shows basic balance sheet information on the plan. You’ll see assets, liabilities, fees…etc.
- Insurance: If there are insurance products in the plan, you’ll find more information here. This includes plans with a group annuity. Here you’ll find, insurance carrier, insurance agent…etc.
- Service Provider: This report tells you more about non-insurance service providers. You’ll see information on investment providers, attorneys, CPAs…etc.
- Investment: On this report you’ll see detailed information on plan investments (when available).
- Plan History: This report will tell you more about the history of the plan (when available), including assets, service providers and contributions.
- Benchmarks: This bar gives you access to charts and graphs showing how a plan compares several factors to other plans in
its industry, local area, asset range and across the country.
- Audit Reports: This bar gives you access to CPA audit data (if available).
- Plan Risk Profile: Generates a fiduciary risk report for the plan you’re looking at.
- Sales Proposal: Create and save custom sales proposal templates.
- Real-Time Update: Access Form 5500 filings just released by the Department of Labor before they are available in electronic format.
Below the column of blue bars, you will also find an index of Form 5500 filings with up to ten years of filings.
Right above where reports are displayed, you’ll see that you have the option to skip to the next or previous plan on the list, go to a specific record (by number) or return to the results list.
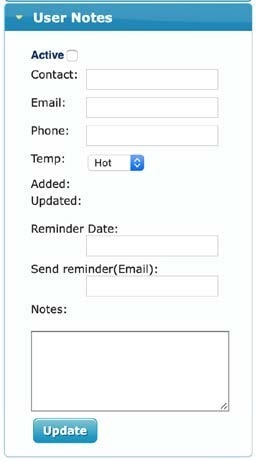
There is also a «User Notes» bar in the top left-hand corner.
STEP 5 – Create a Customized Sales Proposal:
Planisphere comes with a detailed Sales Proposal template prepopulated with plan information that you can customize and save any way you like.
To create, edit or view sales proposals, click on the Sales Proposals bar on the left-hand side of your page. Four options will be available to you. The first is a dropdown menu of your previously saved proposals. The next allows you to create a new sales proposal template. The third option allows you to edit and delete saved proposals and the fourth option takes you to a help page.
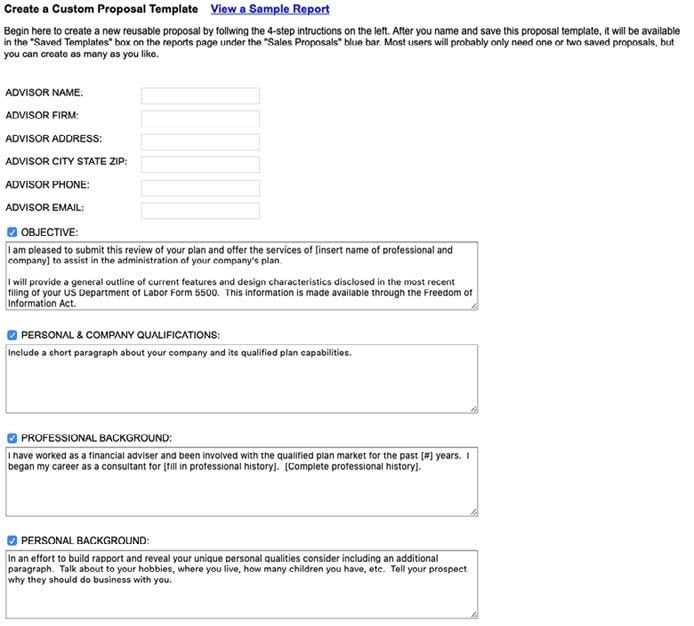
You can create a new custom proposal template in 4 easy steps. As you will see, many of the fields are pre-populated with plan data and generic compliance-friendly language that should suffice for nearly any situation.
- To build your proposal, review and/or modify any of the fields on the right-hand side of your page.
- If you’d like to exclude a particular field, simply uncheck the box next to it.
- Name your proposal and save it for print and/or future use.
- After saving, you’ll return to the report page. To view and/or print your saved template, click on the blue «sales proposal» bar and select from the drop-down list of saved templates. Once you’ve saved a proposal, you can re-use it for any plan at any time by selecting it from the drop-down list under «sales proposal» on the report page. You can also edit or delete proposal templates by clicking «edit proposal templates».
Printing:
On the list page you will see a blue bar on the left-hand side that reads, «Print Reports». Click on the bar to see listed the various report formats available for printing:
- Results List: The six columns you see on the list page.
- Contacts List: A list that includes basic information on each plan such as Company, Contact Name, Address, Plan Participants and Assets.
- Plan Summary: A more detailed basic summary of plan information.
- Financial Information: Balance sheet information on the plan(s).
- Current Insurers and Brokers: Insurance carriers and agents associated with the plan(s). (If available)
- Current Providers: A list of current service providers for the plan(s).
- Current Sponsors and Investments: Investments in the plan(s) (when available).
- Assets and Contributions: Balance sheet data on plan assets and contributions.
- Service Providers: A listing of plan service providers.
- Insurers and Brokers: A listing of insurance carriers and agents associated with the plan.
- Investment Sponsors: Companies providing investment management services to the plan(s)
- Plan Compared to Similar DC Plans: Graphs comparing the plan(s) to comparable DC plans.
- Plan compared to Similar DC Plans with the Same Business Code: Graphs comparing the plan(s) in various criteria to others in its business code.
- Audit Filing: CPA Audit Filings (when available).
To print any of these reports for either one plan or several plans, select either «All» (Max = 1,200) or a range (Max = 1,200).
You will also note that you can print reports or ranges of reports at the plan report level as well. At the top of the report, you’ll see a print bar. To print any report, simply go to that report and click on the print bar.
STEP 6 – Enter notes:
When you’re looking at a particular plan, you’ll see a blue bar above the report bars. Click on it and you’ll see where you can flag a prospect as «hot» «warm» or «cold», enter new contact information, notes…etc. You can also set an email reminder to follow up.
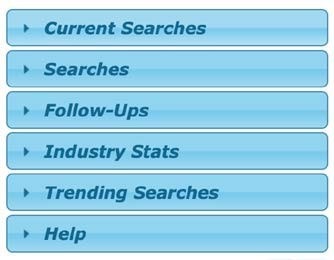
STEP 7 – Return to the Search Screen
The blue bars to the left of the search fields will help you prospect even more effectively. They are ordered as follows:
Current Searches: These are searches you’ve executed in your current session (since you logged in this time). If you just ran a search, but forgot what it was, you can always go back here and find it. Select «make current» to make a selected search the current search.
Saved Searches: You can easily save and name any of your «Current Searches» and they will become «Saved Searches» for use in future sessions. Simply click on the Current Searches bar then click the bar to name a search you previously performed. You have 3 options available with regard to previously named searches 1) you can make that search your current search; 2) rename the search; or 3) delete that search. Note that each search lists the criteria you used in creating that search. In the dropdown menu, add a name and click «save».
Follow Ups: With Planisphere you can now mark specific plans for follow up and enter private notes on your conversations with plan sponsors. You can access this information from anywhere. When you click on the «Follow Ups» bar, you’ll see your personal prospects broken up into 5 categories:
- All Active: If a lead is labeled «active» it’s one that you believe still might result in a sale. You can mark a record as «active» or «inactive» when you’re looking at the plan detail report.
- All Inactive: These are plans you’ve previously pursued but decided to mark as inactive.
- Hot Follow-ups: These are the prospects that you believe to be most promising. You can flag a prospect as «hot», «warm» or «cold» on the plan detail page.
- Warm Follow-ups: These are prospects that you think might have some potential if you work them over time.
- Cold Follow-ups: These are prospects that you haven’t had much of a chance to build a relationship with, but would like to in the future.
Industry Stats: Here you will find a list of graphs displaying overall industry statistics.
Trending Searches: This area allows you to look at activity from users across the country to determine what the hottest new prospecting trends are or see which markets are under prospected.
Help: Direct link to the help menu. In addition to this Help Menu you will see we have added several tutorial videos. You will find these at the top of your Search page.
For any further questions or suggestions please contact us at clientsuccess@rixtrema.com or dial (212) 513-7070 or (800) 282-4567.